With the release of Windows 10 today, many are spinning up VMs and
loading the new workstation on test boxes to take a look at the final
build version. If you are like me, one of the first things I wanted to
test drive was the final release build of the Edge browswer. Quickly
however, I ran into an issue (security feature) out of the box with the
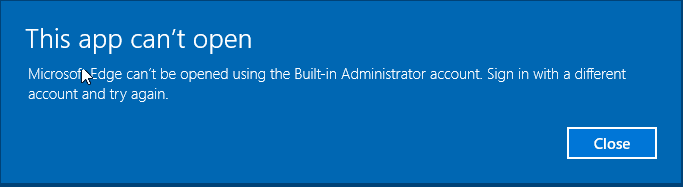
built-in administrator account attempting to launch Edge. I received
the error Microsoft Edge can’t be opened using the Built-in Administrator account. Sign in with a different account and try again.
Microsoft has went the direction of making the Edge browser a true
app now and additional security is in place much like the Internet
Explorer Enhanced Security that we have grown to love and hate.
In order to get around this message in your test environment and be
able to use your Built-in Administrator account to navigate Edge, follow
the following steps to get up and running.
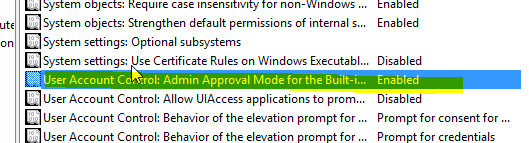
Navigate to your local security policy on your Windows 10 workstation – You can do this by typing secpol.msc at a search/run/command prompt.
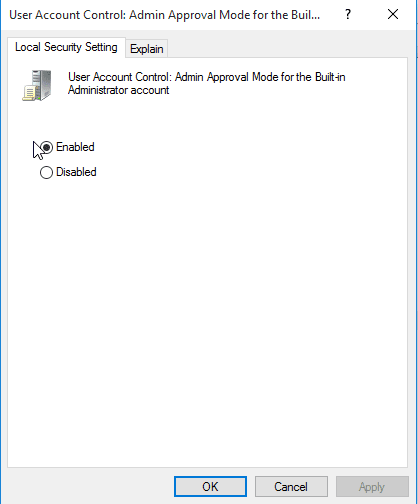
Under Local Policies/Security Options navigate to “User Account Control Admin Approval Mode for the Built-in Administrator account“
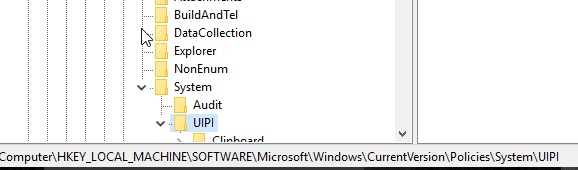
HKEY_LOCAL_MACHINE\SOFTWARE\Microsoft\Windows\CurrentVersion\Policies\System
Over on the right-hand side, you should see a setting for EnableLUA, which you’ll want to customize as follows:
PROBLEM: You will get the following error when you are trying to set your printer as default “Operation could not be completed (error 0x00000709) Double check the printer name and make sure that the printer is connected to the network” SOLUTION: Open Registry editor by typing REGEDIT in the RUN Prompt
Traverse to HKEY_CURRENT_USER\Software\Microsoft\Windows NT\CurrentVersion\Windows
Right Click the Windows key and click Permissions…
Select Allow on Full Control permission and click OK
Close the Registry Editor and restart the machine.
The instructions below apply to machines under Windows=> xp, 7, 8,
8.1, 10, Server 2012, 2008 R2, 2008, and 2003. Follow these steps:
Connect to your server via Remote Desktop
Click simultaneously on the Windows logo + R to open the “Run” dialog and execute the “cmd” command
Open the registry editor by typing the “regedit” command
Search for this registry
subkey: HKEY_LOCAL_MACHINE\System\CurrentControlSet\Control\TerminalServer\WinStations\RDP-Tcp\PortNumber
Double-click or right-click on the “PortNumber” registry subkey,
select the decimal base and type the port number of your choice (the
default port is 3389, in this example, we selected port 3390). Click on
“Ok” to save your selection.
IMPORTANT: Make sure that remote access to your
server through the new port is authorized in your Windows firewall
before executing the next step.
Exit the registry editor
Restart your server
After the reboot, specify the Remote Desktop port number.
WORKS ONLY=> Windows 7 Enterprise, Windows 8 Enterprise, Windows Server
Configure the RemoteApp Host
When configuring the host, I’ve been using been using a 1-to-1 setup, I haven’t tested this with pooled virtual desktops yet.
To enable RemoteApp on the host, install the hotfix, then configure the TsAppAllowList
key in the registry. In this example, I’ve configured the required
entries for running Calculator. Here’s a listing of the registry values I
added with the pertinent values highlighted.
The simplest method of discovering the required registry keys for
each RemoteApp entry is to configure the applications on Windows XP Mode
or Windows Server 2008 running Remote Desktop Services.
Creating RemoteApp Connections
I’ve originally based the .RDP file on those created by the RemoteApp
Manager in Windows Server. There is documentation on TechNet on how to
configure RemoteApp programs and creating the .RDP file for each
application here: Configuring RemoteApp Programs.
The important entries for connecting to Windows XP and Windows Vista, that you may need to add manually, are disableremoteappcapscheck (set to 1) and alternate shell
(set to rdpinit.exe). These were the only additional entries I need to
add the .RDP file to get this working. DisableRemoteAppCapsCheck fixes
the ‘remote computer does not support RemoteApp’ error, and Alternate
Shell makes sure you actually get a published application and not a
remote desktop.
An .RDP file to connect to a RemoteApp program then looks like this (the added lines are highlighted):
1
2
3
4
5
6
7
8
9
10
11
12
13
14
15
16
17
18
19
20
21
22
23
24
25
26
27
28
29
30
31
32
33
34
35
36
37
38
39
40
41
42
43
44
45
46
47
48
49
50
51
redirectclipboard:i:1
redirectposdevices:i:0
redirectprinters:i:1
redirectcomports:i:1
redirectsmartcards:i:1
devicestoredirect:s:*
drivestoredirect:s:*
redirectdrives:i:1
session bpp:i:32
prompt for credentials on client:i:1
span monitors:i:1
use multimon:i:1
remoteapplicationmode:i:1
server port:i:3389
allow font smoothing:i:1
promptcredentialonce:i:0
authentication level:i:2
full address:s:winxp1.domain.local
remoteapplicationprogram:s:||calc
remoteapplicationname:s:calculator
remoteapplicationcmdline:s:
alternate full address:s:winxp1.domain.local
disableremoteappcapscheck:i:1
alternate shell:s:rdpinit.exe
screen mode id:i:2
winposstr:s:0,3,0,0,800,600
compression:i:1
keyboardhook:i:2
audiocapturemode:i:0
videoplaybackmode:i:1
connection type:i:2
displayconnectionbar:i:1
disable wallpaper:i:1
allow desktop composition:i:0
disable full window drag:i:1
disable menu anims:i:1
disable themes:i:0
disable cursor setting:i:0
bitmapcachepersistenable:i:1
audiomode:i:0
redirectdirectx:i:1
autoreconnection enabled:i:1
prompt for credentials:i:0
negotiate security layer:i:1
remoteapplicationicon:s:
shell working directory:s:
gatewayhostname:s:
gatewayusagemethod:i:4
gatewaycredentialssource:i:4
gatewayprofileusagemethod:i:0
use redirection server name:i:0
RemoteApp in Action
When launching the RemoteApp program, the UI isn’t quite as seamless
as you get with the XenApp client. You will first see a warning prompt
if the .RDP file is not signed, and then a dialog box while the client
connects:
If the RemoteApp host is Windows XP, the user will be required to
click the Details button to see the remote login dialog box and enter
their credentials:
If the client is Windows XP or above and the host is Windows Vista or above, you can configurecredential pass-through (single sign-on) to make connecting seamless. You must first enable CredSSP
on Windows XP SP3 clients. Pass-through won’t work for Windows XP hosts
– although you may be able to save the username and password in the
.RDP file instead.
So finally with all of the pieces in place, here’s what you’ll see
with applications running via RemoteApp. In this screenshot I have
Calculator running remotely from Windows XP and Windows Vista next to
the local version.
One thing to note is that the remote applications are all group
together on the taskbar; in this screenshot, the two remote Calculators
are grouped with Remote Desktop Connection – users’ won’t see separate
remote buttons as you get in competing products.
I frequently use symbolic links on Linux, but I rarely use them on
Windows 7. However, creating symlinks in Windows 7 is really easy via
mklink. Here’s the syntax and a simple example.
Tip: When using the
mklink command, never forget the quotes. Also, deleting the symlinks via
the Windows Explorer works, you’re not deleting the actual folder
Mklink Example
Enter mklink /J "C:\Program Files (x86)\Steam\steamapps\common\audiosurf" "D:\audiosurf"
In this example I create a directory junction in C:\Program Files
(x86)\Steam\audiosurf that points to the actual game folder D:\audiosurf
Mklink Command Syntax
MKLINK has 3 options /D, /H and /J. You also need to specify the path
to the new symbolic link and the path to the original file or
directory.
The Syntax: /D – used to create symbolic links for directories (d for directory) /H – used to create hard links (h for hard link) /J – used to create directory junction (j for junction
What Are Hard Links
Hard links can be defined as “real” links to a file. Windows will treat that link as if it was the original file or directory
Soft links are only shortcuts to a directory, they will not be treated as the real file
What Are Directory Junctions?
A directory junction is basically a hard link (see above) to a directory. We will use this in our example.
When To Use Junction Points vs. Symlinks
Most hard links on Windows will be junction points, but certain
programs may only support Symlinks. According to TechNet, symlinks were
first introduced for better Linux compatibility (although I fail to see
how it is compatible at all). In any case, it is a good idea to first
create a junction point and then if that does not work out, create a
symlink. Symlinks are also great for relative file links e.g. ..\..\..\..\my-nested-folder
Mklink: Syntax Incorrect
A common mistake of people who are new to creating symlinks is that
they forget to add the quotation marks. If you enter a long path and you
don’t add the quotation marks to the paths it will output a syntax
error, because of the many spaces.
You can either cd to a directory and use relative paths or you can simply add the quotation marks like mklink /J "path" "path"
If you have any questions how to use mklink or if you need further
examples to fully understand it, you may post your request below.
If you’re running VirtualBox on a Windows computer, you’ll probably
run into errors from time to time. When I migrated my virtual hard
drives from one physical disk to another I ran into a permissions error.
Apparently when Virtualbox creates a .vhd (or other format virtual hard
drive) it bakes in a universally unique identifier that it uses to
recognize VHDs. Normally it doesn’t cause problems, but in this case it
prevents duplicates or moved virtual disks from running from an unknown
location.
The error looks like this:
“Failed to open the hard disk E:\VirtualBox VMs\Windows 8 \Windows 8 Enterprise2.vhd.
Cannot register the hard disk ‘E:\VirtualBox VMs\Windows 8 \Windows 8 Enterprise2.vhd’{ca2bdc6a-a487-4e57-9fcd-509d0c31d86d} because a hard disk ‘E:\VirtualBox VMs\Windows 8 Enterprise\Windows 8 Enterprise2.vhd’ with UUID {ca2bdc6a-a487-4e57-9fcd-509d0c31d86d} already exists.
Result Code: E_INVALIDARG (0x80070057)
Component:
VirtualBox
Interface:
IVirtualBox {3b2f08eb-b810-4715-bee0-bb06b9880ad2}
Callee RC: VBOX_E_OBJECT_NOT_FOUND (0x80BB0001)”
Oracle has a chapter in the VirtualBox manual that covers UUID problems, which may reveal how to fix this. Or you can just follow the steps below.
How to Reset the UUID
To fix this you’ll need to run some text commands. Open up the
Command Prompt. In both Windows 8 and Windows 7 it can be found by
typing “cmd” into the Start Menu search box.
Now change the cmd prompt’s directory to the folder you installed
VirtualBox in. If you put it in the default the command is this:
Introduction
VirtualBox is according to developers:
VirtualBox is a powerful x86 and AMD64/Intel64
virtualization product for enterprise as well as home use. Not only is
VirtualBox an extremely feature rich, high performance product for
enterprise customers, it is also the only professional solution that is
freely available as Open Source Software under the terms of the GNU
General Public License (GPL). See “About VirtualBox” for an
introduction.
And according to Wikipedia:
Oracle VM VirtualBox is an x86 virtualization software
package, originally created by software company innotek GmbH, purchased
by Sun Microsystems, and now developed by Oracle Corporation as part of
its family of virtualization products. It is installed on an existing
host operating system; within this application, additional guest
operating systems, each known as a Guest OS, can be loaded and run, each
with its own virtual environment.
Supported host operating systems include Linux, Mac OS X,
Windows XP, Windows Vista, Windows 7, Solaris, and OpenSolaris; there
is also a port to FreeBSD (only OSE version). Supported guest operating
systems include a small number NetBSD versions and various versions of
Windows, Linux, DragonFlyBSD, FreeBSD, OpenBSD, OS/2 Warp, Solaris,
OpenSolaris, Haiku, Syllable, ReactOS, and SkyOS.
From this, we may know that it is a powerful and useful tool, for
those trying to test new Operating Systems, or try new configurations on
Known Operating Systems. I use it a lot to test new Linux distribution,
without the need to install them on my Hard Disk.
Another great use for it, is to have separated servers on the same
hardware just to improve security, I mean: Why to have DNS server, FTP
server, Web server and all others on the same environment, where an
attack to one of these server may compromise all the others, you can
install Linux on a good Hardware, and VirtualBox on it, and three or
four different virtual machines running Linux to have all those
functions mentioned before on different Virtual Machines, thus
increasing the security of your configuration.
But, enough talking about this, this will be material of another
article, let’s focus on how to manage VirtualBox from the command line,
as you usually will do it from the GUI. List virtual machines from command line
The command we will use for this is VBoxManage and different sub-commands it has, to list the virtual machines installed run:
 VBoxManage list vms

Oracle VM VirtualBox Command Line Management Interface Version 3.2.12
(C) 2005-2010 Oracle Corporation
All rights reserved.

"win7" {3f157880-c642-4be2-b641-85d7aedb5090}
"msn" {acc458d0-435b-44c7-806d-41c4948bb490}
"itunes" {41238c30-5f05-4fda-b008-5169d69505f6}
"Linux-Mint" {c25e1257-dfed-4789-a22b-8489c4d4df05}
"ubuntu" {fee70808-ab0e-473a-8991-d9b711773672}
"xp" {c75ec9b7-90b2-4f97-9e07-1267a3a03cb1}
"ubuntu-netop" {3d216ab8-3b44-46fd-8738-8c631801176e}
"slackware" {f65d5b26-6491-4523-8c06-970cbe6844d5}
"peppermint" {32b1845f-dd72-4c8a-bfe7-8cc3e83d0109}

-----> "slackware" is your OS UUID <------
If you specify -l then, you will get a detailed information about each one of those.
VBoxManage list vms -l
How to start virtual machines from command line
Now that you know which virtual machines are already installed, let’s see how to start them.
You can add those commands to your startup scripts, so virtual machines are started when you to boot your primary Linux server. How to stop a virtual machine from command line
Now we know how to start virtual machines, we need to know how to stop them, there are some options. Pause the virtual machine
This will just put the virtual machine on hold, until un-paused.
VBoxManage controlvm "slackware" pause
Resume the paused virtual machine
VBoxManage controlvm "slackware" resume
Reset -restart- the virtual machine
VBoxManage controlvm "slackware" reset
This will close the virtual machine, and restart immediately, you
unsaved data on the virtual machine will not be saved, and will be lost!
you have been warned. Poweroff or shut down the virtual machine
VBoxManage controlvm "slackware" poweroff
This will poweroff the virtual machine, and once again any unsaved data will be lost. Stop virtual machine, and save data
VBoxManage controlvm "slackware" savestate
This will save current state of the virtual machine and stop it, I
think of this more or less, like hibernate the virtual machine. Create a new virtual machine
You can also create new virtual machines from command line:
VBoxManage createvm -name "LinuxMint" -register
This create a new virtual machine, with default options. Change Settings on the virtual machine from command line
Now we have a new virtual machine created, let’s change some of its default settings, like the allocated RAM:
VBoxManage modifyvm "LinuxMint -memory "1024MB"
Check the complete set of parameters Conclusion
As you can see, VirtualBox is very flexible and fully managed from
the command line, so it can be used on a Dedicated server, in a remote
data center, and you may have all your virtual machines under control.
I’m not saying this is the best option to go for professional
virtualization, but it is certainly a good one, and an easy one too.
Today everyone need to hide or secure data from anonymous user. Here,
I have three simple tricks to hide and restrict use of drive.
Using Group Policy
Using Windows Registry Trick
Using Disk Management – An easy way
Using Group Policy 1. Run Group Policy: Type gpedit.msc in Run dialog box or in Start Search in Windows 7 and Windows Vista. HIDE DRIVES 2. Now navigate to: Local Computer Policy > User Configuration > Administrative Templates > Windows Components > Windows Explorer. Now look for “Hide these specified drives in My Computer” and double click and set the state “Enabled” and pick one combination to hide specified drives. NOTE: You can access these drive by typing path or drive letter in Run dialog box or in address bar. RESTRICT ACCESS 3. It’s same as above but it restrict access instead of hide a specified drive. At the same location in Group Policy look for “Prevent access to drives in My Computer” and double click and set the state “Enabled” and pick one combination to hide specified drives. NOTE: We can hide and restrict specified drive or combination of drives Using Windows Registry Trick 1. Its perform the same as above but We can hide or restrict any specified drive or group of drives. Run Registry Editor and Type regedit.exe” in Run dialog box or in Start Search in Windows 7 and Window Vista. HIDE DRIVES 2. Now navigate to: HKEY_CURRENT_USER\Software\Microsoft\Windows\CurrentVersion\Policies\Explorer and Right click on right side pane and create a new DWORD value and name it NoDrives 3. All drives will be visible as long as its value is set to 0. Now set the value of NoDrives in decimal (make sure you have selected decimal not hexadecimal)
Set the value of NoDrives according to following list.
Drive
Value
A
1
B
2
C
4
D
8
…
…
Z
33554432
All
67108863
To hide multiple drives, just add drives value. For example we want to hide B: and D: drives, the NoDrives value should be 2+8=10. Logoff or restart the system to take effect. RESTRICT ACCESS 4. Now navigate to: HKEY_CURRENT_USER\Software\Microsoft\Windows\CurrentVersion\Policies\Explorer and Right click on right side pane and create a new DWORD value and name it NoViewOnDrive 5. All drives will be visible as long as its value is set to 0. Now set the value of NoViewOnDrive in decimal (make sure you have selected decimal not hexadecimal)
Set the value of NoViewOnDrive according to following list.
Drive
Value
A
1
B
2
C
4
D
8
…
…
Z
33554432
All
67108863
To restrict multiple drives, just add drives value. For example we want to hide B: and D: drives, the NoViewOnDrive value should be 2+8=10. Logoff or restart the system to take effect. Using Disk Management – An easy way
It is the simplest way among all three. We can assume that today
anyone that have knowledge in Windows Administration; can remove
security. But it’s new and easier. The advantage of this trick is that
there is no access via typing path in Run Dialog box or address bar. 1. Run Disk Management: Right click on Computer or My Computer > Manage and navigate to Disk Management and select the drive that to be hide and secured. Right click on specified drive and click on Change Drive Letter and Paths. Here click on “Remove” button and “OK” and then “Yes” to commit changes. NOTE: No need to Restart or Log off Windows. System partition or
contain pagefile of Windows partition can’t be hide and secured. TO REVERT BACK TO DEFAULTS: REMOVE ALL REG SETTING AND ASSIGN DRIVE LETTER. Applies To:
A while ago on Tweak And Trick, I published an article on
changing your processor name. But recently, Anil Kumar pointed out that
the trick only changed the name temporarily.
After a user restarts his computer, the name reverted back to original
which is obvious as each time Windows boots, it checks the connected
hardware and updates the registry value automatically. So, changing the processor name using the earlier article did not have permanent results.
Thus, the alien processor name you had earlier again reverted back to the boring old one.
Problem: To, make the name change permanent, it was required to update the Processor Name String registry key every time Windows starts.
Solution: It is very easy to change your processor name permanently
by creating a registry key and placing a shortcut to it in the Windows
start up folder. To do so, just follow the steps given below:- Steps :-
1. Open Notepad.
2. Copy and paste the exact code given below:-
Windows Registry Editor Version 5.00
[HKEY_LOCAL_MACHINE\HARDWARE\DESCRIPTION\System\CentralProcessor\0]
“ProcessorNameString”=”My Processor name 50000MHz”
To change the processor name, edit the part of the code given
in blue. Also understand that \0 in the above code should only be
present if Windows store your processor name at that location. Open the
Registry Editor and navigate to the above mentioned keys to check
whether or not to include the \0.
3. Click on File Menu, click on Save As and select “All Types” in
the Save as Type option. Save the file as ProcessorNameChange.reg or
*.reg.
4. Create a new shortcut on your desktop. Enter regedit / S “Location
of the .reg file” as the location of the item. For example, enter regedit /S “C:\Processor Name.reg” if your registry file is located in the root of C:\ drive.
5. Copy the created Shortcut file.
6. Navigate to C:\Documents and Settings\All Users\Start Menu\Programs\Startup(in Windows XP) or toC:\Users\
User-Name\AppData\Roaming\Microsoft\Windows\Start Menu\Programs\Startup
(in Windows 8, Windows 7 and Windows Vista. Also remember that AppData
is a hidden folder.) if C: is your System drive.
7. Paste the copied file. This registry file would now execute each time when
Windows starts and the Processor Name String would be modified each
time. This means that even upon restarting your computer, you will see
that the changed processor name is permanent.
Are you bored with your old processor? Do you want a new
processor with a breath-stopping name but are not going to upgrade any
time soon? No need to worry. You can still have that new processor’s
name displayed in your computer. Well not only that, you can also have a
better one than the one you are planning to buy. Just follow this
trick.
With this trick, you can change the name of your processor to a
personalized one like My Processor or something extreme like Decacore
Processor 50 GHz . These are just a few examples. You can change the
name of your processor to anything you like.
To have one such cool processor name displayed in your computer, follow these steps:-
Click on Start.
Click on Run.
Type “regedit” without quotes.
Navigate to HKEY_LOCAL_MACHINE/HARDWARE/
From HARDWARE, navigate to DESCRIPTION/System/CentralProcessor/.
In the work area, double click on ProcessorNameString, and change its value according to your choice.
Click OK
Right click on the Computer icon and select properties.The final outcome would be something like the one in the image.
Try it on your PC and show it to your friends to see the fun.
P.S.: Personally, I have recently changed the name of my processor to
“iLife Processor 7, Alien Technologies”. Tell me what you change yours
to.
Installing Guacamole ( Web based HTML 5 RDP Client) from source
Guacamole is getting most popular nowdays since it
can be integrated to any of the programming language to access the
remote servers either over the RDP protocol or VNC protocol without
proving users to login credentials. I see it’s a first initiate of such
solution ie HTML5 Clientless Remote Desktop Role of Guacomole
I see this tools will be useful those who is looking for RDP access to
office from remote location without opening any port in firewall or not
establishing VPN connection to access to server. he can access the RDP
server immediately after the Guacamole login.
Pls keep in mind that opening Guacamole portal to public without SSL security is a RISK. So act wisely
Guacomole website provides binary distribution for Ubuntu and fedora. My initial attempts was with Ubuntu 12.04 LTS and 11. Really Sucks !!
Both attempts were failed due to lack of dependencies and may crashed
Ubuntu package integrity. So I plan to compile it from source. Compiling Guacomole
I got it work on Amazon Linux AMI (32 bit) and CentOS 6 as well.
Package Requirements are a. libguac-0.7.0.tar.gz
b. guacd-0.6.2.tar.gz
c. libguac-client-rdp-0.7.1.tar.gz [ I skipped this option since I uses only RDP support]
d. libguac-client-rdp-0.7.0.tar.gz
e. guacamole-0.7.0.tar.gz
f. apache-maven-3.0.4-bin.tar.gz
g. YUM package support for freerdp,libvncserver [optional],cairo-devel, automake,libtool,gcc++
h. You may need to install repository support for RpmForge and EPEL repository.
Now we need to edit /etc/yum.repos.d/epel.repo and make enabled =1 for the first selection “Extra Packages for Enterprise Linux 6″ to install freerdp package.
########### installing dependencies ############
[root@rc-136 guacomole]#yum install libng* freerdp freerdp-devel cairo-devel gcc* gcc++ make automake libtool
[root@rc-136 guacomole]#cd /home/installation/guacomole
#### Installing libguac #######
[root@rc-136 guacomole]# tar -xzf libguac-0.7.0.tar.gz
[root@rc-136 guacomole]# cd libguac-0.7.0/
[root@rc-136 guacomole]# ./configure
[root@rc-136 guacomole]# make
[root@rc-136 guacomole]# make install
[root@rc-136 guacomole]# ldconfig
[root@rc-136 guacomole]# cd ..
#### Installing guacd reverse proxy daemon #######
[root@rc-136 guacomole]# tar -xzf guacd-0.7.0.tar.gz
[root@rc-136 guacomole]# cd guacd-0.7.0/
[root@rc-136 guacomole]# ./configure –with-init-dir=/etc/init.d
[root@rc-136 guacomole]# echo “/usr/local/lib” >> /etc/ld.so.conf && ldconfig
[root@rc-136 guacomole]# make
[root@rc-136 guacomole]# make install
#### Installing RDP support #######
[root@rc-136 guacomole]# cd ..
[root@rc-136 guacomole]#tar -xzf libguac-client-rdp-0.7.1.tar.gz
[root@rc-136 guacomole]# cd libguac-client-rdp-0.7.1/
[root@rc-136 guacomole]# ./configure
[root@rc-136 guacomole]# make
[root@rc-136 guacomole]# make install
[root@rc-136 guacomole]# ldconfig
#### Installing apache-maven package installer #######
[root@rc-136 guacomole]# wget http://www.eng.lsu.edu/mirrors/apache//maven/binaries/apache-maven-2.0.11-bin.tar.gz
[root@rc-136 guacomole]#cp -r apache-maven-2.0.11-bin /usr/local/maven
[root@rc-136 guacomole]#M2_HOME=/usr/local/maven/;export M2_HOME
[root@rc-136 guacomole]#PATH=$PATH:/usr/local/maven/bin;export PATH
#### Installing apache tomcat6 installer #######
[root@rc-136 guacomole]##yum install tomcat6
# webapps directory will in “/var/lib/tomcat6/”
#### Installing Installing Guacamole building from source #######
[root@rc-136 guacomole]# tar -xzf guacamole-0.6.1.tar.gz
[root@rc-136 guacomole]# cd guacamole-0.6.1/
[root@rc-136 guacomole]# mvn package
[root@rc-136 guacomole]# cp target/guacamole-0.7.0.war /var/lib/tomcat6/webapps/guacamole.war
[root@rc-136 guacomole]#mkdir /etc/guacamole
[root@rc-136 guacomole]#cp doc/example/guacamole.properties /etc/guacamole/guacamole.properties
[root@rc-136 guacomole]#ln -s /etc/guacamole/guacamole.properties /usr/share/tomcat6/lib/
Now we need to create a guacamole config. file. This will manage all
the settings inside the application. Here is one sample file for /etc/guacamole/user-mapping.xml
Create a file (/etc/guacamole/user-mapping.xml) having the following content.
Now we are going to restart all the services required for this platform. a. Starting guacd reverse proxy daemon
[root@rc-136 guacamole]# /etc/init.d/guacd start
Starting guacd: guacd[17267]: INFO: Guacamole proxy daemon (guacd) version 0.7.0
guacd[17267]: INFO: Successfully bound socket to host ::1, port 4822
guacd[17267]: INFO: Exiting and passing control to PID 17268
SUCCESS
guacd[17268]: INFO: Exiting and passing control to PID 17269
[root@rc-136 guacamole]#
[root@rc-136 guacamole]# netstat -nlp | grep “4822”
tcp 0 0 0.0.0.0:4822 0.0.0.0:* LISTEN 17269/guacd
[root@rc-136 guacamole]#
Pls note I see some cases, we used to get “server error” when guacd
started automatically through startup script. So we need to run it
manually after booting. b. Starting Tomcat service and Guacamole Application.
Pls note that we already had copied guacamole.war inside tomcat webapps (/var/lib/tomcat6/webapps)
c. Setting Guacamole app as proxy application to outside the world in clean url.
Pls note that I did not use any SSL security here. We need to install
Apache and edit the config. file. I expect proxy module is already
enabled in Apache install.
Edit /etc/httpd/conf/httpd.conf and add the following lines
<Location /guacamole/>
Order allow,deny
Allow from all
ProxyPass ajp://localhost:8009/guacamole/ max=20 flushpackets=on
ProxyPassReverse ajp://localhost:8009/guacamole/
</Location>
Then restart Apache
[root@rc-136 guacamole]# service httpd restart
Stopping httpd: [ OK ]
Starting httpd: [ OK ]
[root@rc-136 guacamole]#
Now you can access Guacamole over either http://localhost/guacamole or http://localhost:8080/guacamole and configure it on any application you want to integrate.
You will get some issues if you plan to use Guacamole using tomcat url ( localhost:8080) This may lead to get Connection Closed” freequently. So better to configure it as proxy in Apache/or Ngnix using the option max=20 flushpackets=on
Here are some screens Login form
User name and password will be “admin” Landing Page Connecting a Windows XP box from Guacamole Connecting to Windows 7 Desktop Multiple session screen
How to use TWACKER to check if my device is TWAIN Compliant?
Although most of the scanners in the market are TWAIN compliant, scanner model, such as ScanSnap, doesn’t support TWAIN.
To find out, we can use the tool called TWACKER developed by the
TWAIN Working Group for testing data sources like scanners, cameras,
etc. Pleae NOTE that TWACKER works only Windows, for Mac-only devices, please contact the scanner vendor for more info.
TWACKER can be downloaded here: TWACKER 32 bitTWACKER 64 bit
To use the tool:
1. First open the installed program:
2. Select your device:
If your device is not listed, please check if the driver is installed.
Or, you can try running Twacker as “Admin” since you may not have
permission to access the data source.
3. Choose the settings and try scanning:
4. If the scanning is successful without any errors, then your device
should be TWAIN compliant. You can also try other commands and see how
it works. If your scanner doesn’t work with TWACKER, please check your scanner model online and install a TWAIN driver. Our scanning SDK Dynamic Web TWAIN and ImageCapture Suite both support TWAIN based scanners.
Home Page——\/——\/——\/——\/ http://www.furulevi.go.ro/ This patch enables to use more than 3 GigaByte of Memory
(RAM) on 32-bit Windows 8. By default Windows 8 32-bit (also called x86)
recognizes more than 3 GB RAM installed in a PC, but it will not use
all of that.
Program used to patch Windows 8 “Windows 8 RAM Patch 0.8.0.1”. This patch is also working under Safe Mode. Issues:
– Not all programs can successfully use the memory enabled by the patch!! – This patch can’t be used under Windows XP, Windows Vista, Windows 7, Windows 8.1
Download Windows 8 RAM Patch 0.8.0.1: Server 1, Server 2.
How to do it: 1. Temporarily disable or uninstall antivirus !
2. Start the program (Windows 8 RAM Patch 0.8.0.1)
3. Click Next;
4. If Windows 8 is not already patched than “Remove RAM limitation (4Gig)” should be already checked; Click Start
5. “Restart computer now” should be automatically checked; Save all your work and click Finish to restart your PC.
6. When restarting the computer, a new boot menu entry should appear
called “Windows 8 RAM Patch 0.8.0.1”; Press enter or wait a few seconds
to automatically start the patched version of Windows 8.
7. After Windows 8 finished loading check in System Properties if the
RAM usage limit was successfully eliminated. To open System Properties
press Windows key + PauseBreak, or open File Explorer, rightclick
Computer, click Properties)
Operating system patched in this video: Windows 8, 32-bit.
Initial memory usable: 3.5 GB (only 87.5%)
Memory usable after patching: 4 GB (100%)
After patching Windows 8 (32bit) the memory limit will be 128GB instead of around 2 – 3.5 GB.
Enable more than 3GB RAM on 32-bit Windows 8 (PatchPae2) This patch enables to use more than 3
GigaByte of Memory (RAM) on 32-bit Windows 8. By default Windows 8
32-bit (also called x86) recognizes more than 3 GB RAM installed in a
PC, but it will not use all of that. NOT ALL PROGRAMS CAN SUCCESSFULLY USE THE MEMORY ENABLED BY THE PATCH!! Program used to patch Windows 8: PatchPae2.
Older version of PatchPae is not compatible with Windows 8.
Download PatchPae2: Server 1, Server 2.
Operating system patched in this video: Windows 8 Pro 32-bit.
Initial memory usable: 3.5 GB (only 70%)
Memory usable after patching: 5 GB (100%)
After patching Windows 8 (32bit) the memory limit will be 128GB instead of around 2 or 3 GB.
Before you start patching: -temporarily disable or uninstall antivirus !!!!!!!!!!!!!!!! -temporarily disable user account control
-temporarily disable windows defender -make sure all commands are typed correctly (don’t trust copy & paste !!)
-make sure you have administrator rights How to do it: 1. Copy PatchPae2 to C:\
2. Open Command Prompt as Administrator
3. go to Windows\system32 by typing:
%systemdrive%
cd\
cd %windir%\system32
4. C:\PatchPae2\PatchPae2.exe -type kernel -o ntoskrnx.exe ntoskrnl.exe this patches kernel to enable max 128GB RAM
5. C:\PatchPae2\PatchPae2.exe -type loader -o winloadp.exe winload.exe this patches loader to disable signature verification
6. bcdedit /copy {current} /d “Windows 8 (PAE Patched)” this creates new boot entry
7. bcdedit /set {xxxxxxxx-xxxx-xxxx-xxxx-xxxxxxxxxxxx} kernel ntkrnlpx.exe this sets new boot entry to load new patched kernel
8. bcdedit /set {xxxxxxxx-xxxx-xxxx-xxxx-xxxxxxxxxxxx} path \Windows\system32\winloadp.exe this sets new loader to be new patched loader
9. bcdedit /set {xxxxxxxx-xxxx-xxxx-xxxx-xxxxxxxxxxxx} nointegritychecks 1 this will disable verification of the loader
OPTIONAL
10. bcdedit /set {bootmgr} default {xxxxxxxx-xxxx-xxxx-xxxx-xxxxxxxxxxxx} this will set the patched boot entry to be the default 11. bcdedit /set {bootmgr} timeout 5 this sets timeout to shorter
Home Page——\/——\/——\/——\/ http://www.furulevi.go.ro/
The kernel of the 32-bit version of Windows 7 has only a lock, which
prevents access to more memory. More dramatically is this lock in the
32-bit version of Windows 7 Starter Edition: There the prohibition is
much more rigorous and it only allows access to 2 GB of RAM:
In the 32-bit version of Windows 7 from 4 GB usually only 3.25 -3.5 GB of RAM are usable:
In general many people believe this “not usable” RAM
is occupied by the graphic card RAM:
The German computer magazine c’t has made a test
with different graphic cards (c’t 23/2009, page 165):
Graphic card RAM
Usable RAM from 4 GB
0 MB
3.5 GB
128 MB
3.5 GB
256 MB
3.25 GB
512 MB
3.25 GB
1024 MB
3.25 GB
These results are completely incomprehensible. Why is with no video card (0 MB, connection via Remote Desktop)
512 MB RAM blocked? Why blocked a graphic card with 128 MB also 512 MB
RAM – and not 128 MB? And why blocked a graphic card with 1024 MB “only”
750 MB?
The Russian Programmers Group “staforce” has written a small program
witch removes the lock in the kernel of the 32-bit version of Windows 7.
“ICE Technologie” has translate this program into English. The program
automatically makes a copy of the kernel file “ntkrnlpa.exe” and saves
the copy as separate file “ntkrlICE.exe”. Then the program removes the
lock in the copied file “ntkrlICE.exe” and integrates the new kernel
file as an extra boot menu entry in the Windows 7 boot menu. So then you
have the option to start Windows 7 either as usual with the original
kernel file “ntkrnlpa.exe” or with the modified kernel file
“ntkrlICE.exe”.
With such a patched (modified) kernel the 32 bit version of Windows 7
suddenly can use almost the entire 4 GB of RAM:
For these screen shots a 32 MB onboard graphic card is used. So 32 MB
is really “hardware reserved”. The rest of 2 MB is reserved for I/O
ports (USB port, serial-, parallel port, etc.).
And even 8 GB of RAM are now no longer a problem.
The original kernel still reports that 4898 MB are “Hardware Reserved” – what hardware?
The patched kernel then reports correct that only 34 MB is “Hardware Reserved”:
The RAM limit of the 32-bit version of Windows 7 is therefore 64 GB –
like Microsoft describes for the “Windows Server 2003 Datacenter
Edition” (see above). More extensive details – still from Vista-times –
see here by Geoff Chappell.
The program makes automatically a copy of the kernel file, then
removes the lock and integrates the new kernel file as an extra boot
menu entry in the Windows 7 boot menu. So then you have the option to
start Windows 7, either as usual with the original kernel file or with
the modified kernel file.
The patch program does not need to install – it runs as a “stand-alone” program; e.g. directly from a USB stick. And it installs no background program.
What the patch is doing you can read here in German language or here in machine translation. So you also can do it manually
The patch has two small but treatable side effects:
Because Windows 7 observed the changes the kernel can not boot
normally. For the Microsoft programmers who often times work with
patched kernel Microsoft has built in a boot parameter – an additional
switch: “testsigning = Yes”). So they can test their patched kernels.
With this switch the patched kernel can start easily.
But this switch leads to the fact that on the desktop background,
lower right corner (above the clock) a hint (“Watermark”) is displayed:
To remove this “watermark” you can use the button “Remove Watermark”:
Then you should reboot.
To change the boot menu you can start the Windows 7 program “msconfig”:
On the tab “Boot” you can specify:
Which boot menu entry to be booted by default (if the user does not interact).
How long should the Start menu appear.
And you can delete one or the other boot menu entry.
However, you should not remove the boot menu entry for the original
kernel. Because there are some very few programs that do not get along
with as much RAM as the kernel patch makes available. Then you can
always reboot the original kernel.
To remove the patch you only need remove the start Menu entry with
“msconfig” (you can start the program “msconfig” when you enter in the
search box in the start menu “msconfig”). The boot menu then will no
longer appear. Because as long as only one menu item is available, no
boot menu appears. The copied, patched kernel file “ntkrlICE.exe” in the
folder “C:\Windows\system32” can also be safely deleted.
In a Command Prompt with admin rights you can see with the command
“bcdedit” the new boot menu entry in detail:
The text that appears in the boot menu can be found under “description“.
“testsigning = Yes” allows the patched kernel to start despite modification.
The copied and modified kernel is called “ntkrlICE.exe“.
With “pae = ForceEnable” the address extension for the RAM is activated.
Enable more than 3GB RAM on 32-bit Windows 7 (PatchPae):
This patch enables to use more than 3 Giga Byte of Memory (RAM) on
32-bit Windows 7. By default Windows 7 32-bit (also called x86)
recognizes more than 3 GB RAM installed in a PC, but it will not use all
of that. NOT ALL PROGRAMS CAN SUCCESSFULLY USE THE MEMORY ENABLED BY THE PATCH!!
Program used to patch Windows 7: PatchPae.
Download PatchPae:
Server 1 Server 2
Tested and working on: Windows Vista SP2; Windows 7 SP1.
Operating system patched in this video: Windows 7 Ultimate SP1.
Initial memory usable: 3.5 GB (only 70%)
Memory usable after patching: 5 GB (100%)
After patching Windows 7 (32bit) the memory limit will be 128GB instead of ~3GB.
Before you start patching:
-temporarily disable or uninstall antivirus !!!!!!!!!!!!!!!!
-temporarily disable user account control
-temporarily disable windows defender
-make sure all commands are typed correctly (don’t trust copy & paste !!)
-make sure you have administrator rights
How to do it:
1. Copy PatchPae to C:\
2. Open Command Prompt as Administrator
3. cd Windows\system32 4. C:\PatchPae\PatchPae.exe -type kernel -o ntkrnlpx.exe ntkrnlpa.exe this patches kernel to enable max 128GB RAM 5. C:\PatchPae\PatchPae.exe -type loader -o winloadp.exe winload.exe this patch loader to disable signature verification 6. bcdedit /copy {current} /d “Windows 7 (PAE Patched)” this creates new boot entry 7. bcdedit /set {xxxxxxxx-xxxx-xxxx-xxxx-xxxxxxxxxxxx} kernel ntkrnlpx.exe this sets new boot entry to load new patched kernel 8. bcdedit /set {xxxxxxxx-xxxx-xxxx-xxxx-xxxxxxxxxxxx} path \Windows\system32\winloadp.exe this sets new loader to be new patched loader 9. bcdedit /set {xxxxxxxx-xxxx-xxxx-xxxx-xxxxxxxxxxxx} nointegritychecks 1 this will disable verification of the loader
OPTIONAL
10. bcdedit /set {bootmgr} default {xxxxxxxx-xxxx-xxxx-xxxx-xxxxxxxxxxxx} this will set the patched boot entry to be the default
11. bcdedit /set {bootmgr} timeout 5 this sets timeout to shorter 12. Restart the computer!
You most probably know how to assign a drive letter to a network share,
but that’s not impressive. Why not change that by mapping your network
shares from the command prompt?
Mapping a Network Drive in Windows
To map a network drive from the command prompt we have to use the net
use command. If you already know the UNC path to your share, then you’re
good to go–the following command will map the movies share to the S
drive. net use s: \\tower\movies
Your share will probably be protected with some sort of
authentication, and the user switch allows us to specify a username and
password. The following example assumes: The username you authenticate with on the remote machine is HTG The password for the HTG account is Pa$$word net use s: \\tower\movies /user:HTG Pa$$word
Demo=>net use z: \\192.168.0.7\demo /user:Admin 123
(UserName=Admin)
(Password=123)
The previous commands are not persistent, this means that the minute
you reboot your PC the shares will disappear from your computer. To get
the shares to survive a reboot, you need to add use the persistent
switch. Note that you can also just use /P instead.
net use s: \\tower\movies /P:Yes
If you ever need to delete a mapped network drive, you can use the delete switch after specifying it’s drive letter.
net use s: /Delete
Alternatively, if you ever want to get rid of all the shares on your
machine, you can use the wildcard character instead of specifying a
specific drive letter.
net use * /Delete
That’s all there is to it.