Virtual Memory Settings:
Virtual memory for your computer is hard drive space used by Windows when it fills up the physical RAM. Let’s say you have a computer that has 1 GB of RAM and you’re running several applications at once that might need a total of 1.5 GB of memory. Windows will fill up the 1 GB and then uses the free space on the hard drive to store the rest. This is called the paging file or virtual memory and Windows will increase and decrease the size of this file as needed. Writing to disk takes much longer than writing to physical RAM, so when Windows uses the paging file, computer performance degrades.
That’s why you’ll always hear people asking if you have enough RAM because the more RAM you have, the better your computers’ performance will be. However, we can tweak the virtual memory settings so that the paging file does not get fragmented and so that Windows does not have to grow or shrink the size of the paging file, both of which will cause the computer to slow down, especially on older machines.
By default, Windows uses the boot partition (the partition that contains your operating system files) and it is recommended to set the size of the paging file to 1.5 times the amount of RAM that you have.
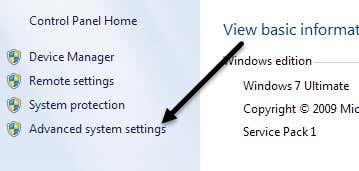
To change the virtual memory settings, go to Start, Control Panel and click on System. Click on theAdvanced tab and under the Performance box, click Settings. In Windows 7, you’ll need to click onAdvanced System Settings on the left side to bring up the System Properties dialog.


On the Performance dialog, click the Advanced tab and then click Change under the Virtual Memoryheading.

Now you’ll see the Virtual Memory settings as shown below. In Windows 7 and higher, the Automatically manage paging file size for all drives box is checked by default. If you’re running Windows 8 on a solid state hard drive with a Core i3, i5 or i7 processor, then you probably don’t need to worry about changing any setting here as it won’t make any big difference in terms of speed. However, if you have an older machine running Windows 7, for example, then it might make sense to adjust the paging file settings according to the rules I mention below.

Here are the generally accepted rules for setting your paging file correctly:
To get the best performance it is best to create a paging file on a different partition than the boot partition (the drive that contains that operating system, which is usually the C drive) and to also create it on a separate hard drive. In this way, Windows can handle more I/O requests because the paging file will not have to compete with the system folder that needs to be constantly accessed as Windows runs.
The only problem with completely moving the paging file off the boot partition is that Windows uses the page file to write out debug info in case your computer crashes with blue screen of death STOP error. This is important for machines that have critical data, but for the average user, this is not a big deal. If you get the blue screen of death, it’s not an easy process at all to get to read the file and even if you can, it can be quite complex. But if you have enough space, then you can leave the paging file there.
So the best solution is to create on paging file on the boot partition that will take care in case of a crash and create another paging file on a separate partition on a DIFFERENT hard drive preferably. If you only have one hard drive on your computer, then just create another paging file on a different partition. Windowsautomatically uses the paging file that is on the less accessed partition using an internal algorithm.
Even more ideal would be if you could put the paging file in it’s own partition with no other data. This ensures that the paging file will never become fragmented and hence performance will be better. If it’s on a drive that has other data and the paging file must be expanded and if there is other data current stored, the file will become fragmented.
Another way to reduce fragmentation of the paging file is to set the initial and maximum sizes to the same number. What this does is ensure that the file does not grow or shrink and therefore will not fragment. However, you should defragment the hard drive before doing this to ensure the paging file is altogether on the hard drive.

So if you have only one partition, set the initial and maximum sizes to 1.5 times the amount of RAM you have. If you have more than one partition, select the boot partition and set the initial and max to 250MB. The reason for this is because it’s better to create another paging file on the other partition and create one paging file on the boot partition that’s just big enough for the mini dump file, which is 250MB.
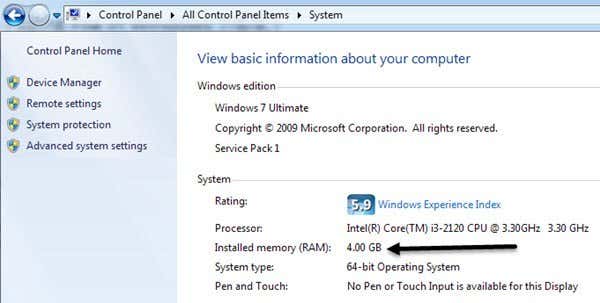
On your second partition, select Custom Size and set the initial and maximum values to 1.5 times the amount of physical RAM you have. You can determine the amount of RAM you have by going to Start, Control Panel, and clicking on System. You’ll see the amount of RAM at the bottom right.

Hopefully this article helped you better understand the virtual memory settings in Windows and when and how it’s best to change them! Please feel free to comment!
Virtual memory for your computer is hard drive space used by Windows when it fills up the physical RAM. Let’s say you have a computer that has 1 GB of RAM and you’re running several applications at once that might need a total of 1.5 GB of memory. Windows will fill up the 1 GB and then uses the free space on the hard drive to store the rest. This is called the paging file or virtual memory and Windows will increase and decrease the size of this file as needed. Writing to disk takes much longer than writing to physical RAM, so when Windows uses the paging file, computer performance degrades.
That’s why you’ll always hear people asking if you have enough RAM because the more RAM you have, the better your computers’ performance will be. However, we can tweak the virtual memory settings so that the paging file does not get fragmented and so that Windows does not have to grow or shrink the size of the paging file, both of which will cause the computer to slow down, especially on older machines.
By default, Windows uses the boot partition (the partition that contains your operating system files) and it is recommended to set the size of the paging file to 1.5 times the amount of RAM that you have.
To change the virtual memory settings, go to Start, Control Panel and click on System. Click on theAdvanced tab and under the Performance box, click Settings. In Windows 7, you’ll need to click onAdvanced System Settings on the left side to bring up the System Properties dialog.
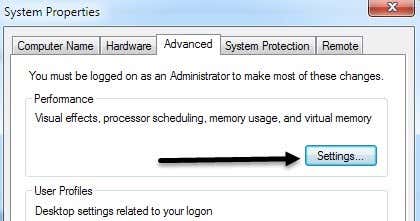
On the Performance dialog, click the Advanced tab and then click Change under the Virtual Memoryheading.

Now you’ll see the Virtual Memory settings as shown below. In Windows 7 and higher, the Automatically manage paging file size for all drives box is checked by default. If you’re running Windows 8 on a solid state hard drive with a Core i3, i5 or i7 processor, then you probably don’t need to worry about changing any setting here as it won’t make any big difference in terms of speed. However, if you have an older machine running Windows 7, for example, then it might make sense to adjust the paging file settings according to the rules I mention below.

Here are the generally accepted rules for setting your paging file correctly:
To get the best performance it is best to create a paging file on a different partition than the boot partition (the drive that contains that operating system, which is usually the C drive) and to also create it on a separate hard drive. In this way, Windows can handle more I/O requests because the paging file will not have to compete with the system folder that needs to be constantly accessed as Windows runs.
The only problem with completely moving the paging file off the boot partition is that Windows uses the page file to write out debug info in case your computer crashes with blue screen of death STOP error. This is important for machines that have critical data, but for the average user, this is not a big deal. If you get the blue screen of death, it’s not an easy process at all to get to read the file and even if you can, it can be quite complex. But if you have enough space, then you can leave the paging file there.
So the best solution is to create on paging file on the boot partition that will take care in case of a crash and create another paging file on a separate partition on a DIFFERENT hard drive preferably. If you only have one hard drive on your computer, then just create another paging file on a different partition. Windowsautomatically uses the paging file that is on the less accessed partition using an internal algorithm.
Even more ideal would be if you could put the paging file in it’s own partition with no other data. This ensures that the paging file will never become fragmented and hence performance will be better. If it’s on a drive that has other data and the paging file must be expanded and if there is other data current stored, the file will become fragmented.
Another way to reduce fragmentation of the paging file is to set the initial and maximum sizes to the same number. What this does is ensure that the file does not grow or shrink and therefore will not fragment. However, you should defragment the hard drive before doing this to ensure the paging file is altogether on the hard drive.
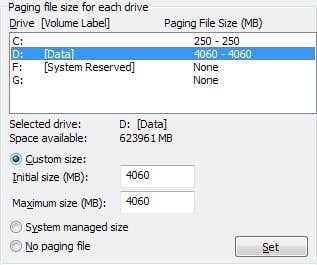
So if you have only one partition, set the initial and maximum sizes to 1.5 times the amount of RAM you have. If you have more than one partition, select the boot partition and set the initial and max to 250MB. The reason for this is because it’s better to create another paging file on the other partition and create one paging file on the boot partition that’s just big enough for the mini dump file, which is 250MB.
On your second partition, select Custom Size and set the initial and maximum values to 1.5 times the amount of physical RAM you have. You can determine the amount of RAM you have by going to Start, Control Panel, and clicking on System. You’ll see the amount of RAM at the bottom right.
Hopefully this article helped you better understand the virtual memory settings in Windows and when and how it’s best to change them! Please feel free to comment!
No comments:
Post a Comment
Dear Friend ♥